By Anne Hy
Vegetarian Hand Rolls (Temaki Sushi)
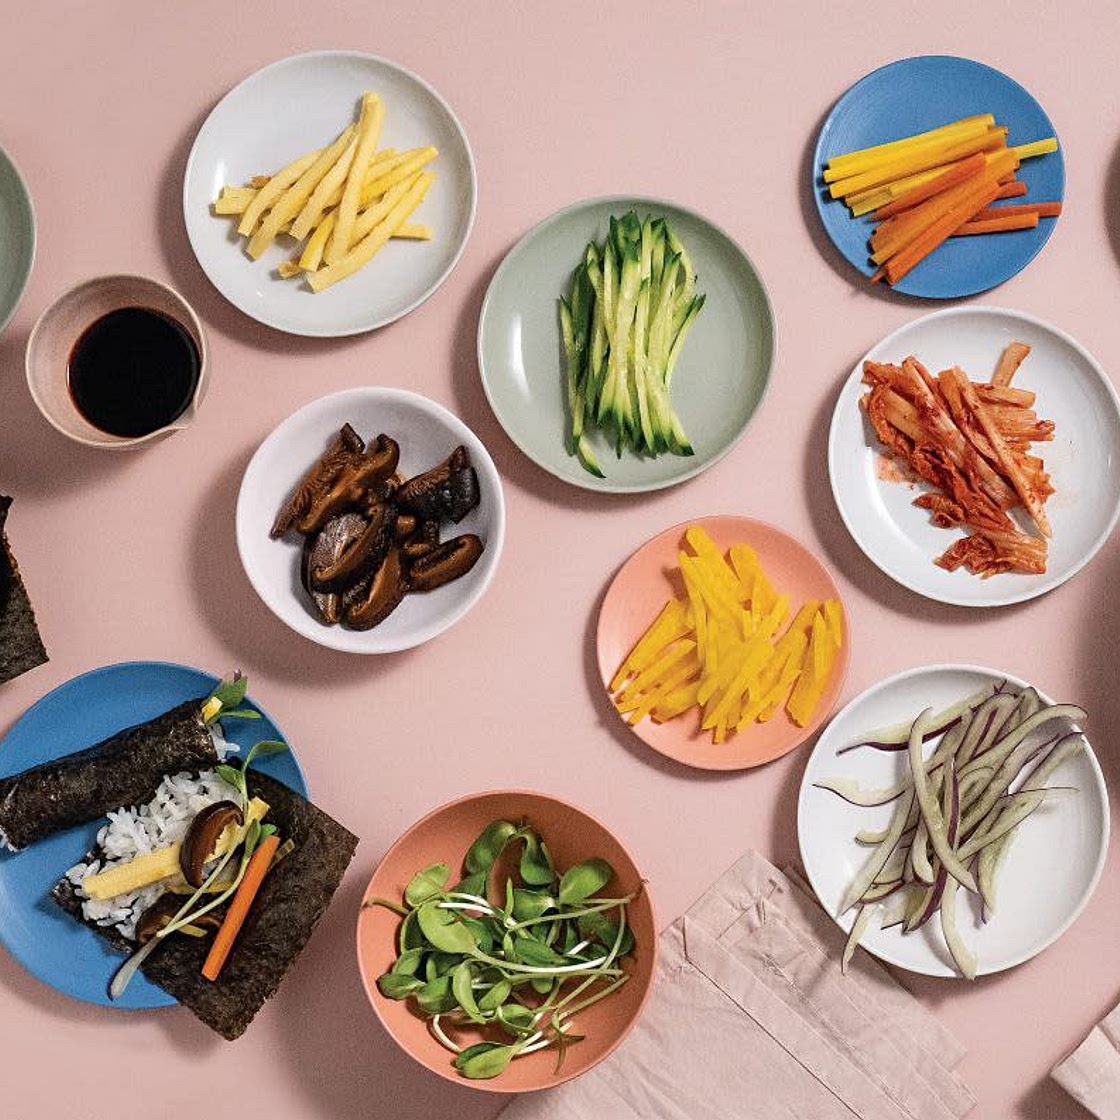
Top, from left to right: Kohlrabi, Soy Sauce, Baked Japanese “Omelet,” Cucumber, Citrus Carrots
Middle: Toasted Nori, Pickled Shiitake Mushrooms, Gingery Quick-Pickled Beets, Kimchi
Bottom center: Sprouts
One of Vincent’s and my favorite “snack spots” is Daigo Hand Roll Bar, at the Dekalb Market Hall in downtown Brooklyn. Per its name, Daigo’s specialty is a thoughtful, impeccably made menu of Japanese temaki sushi, a style where rice and sushi fillings are rolled up like a cigar in a piece of toasted nori, handed over directly by the chef, and meant to be eaten immediately—before the nori loses its crispness and the delicate balance of temperatures (warm rice, cool fillings) escapes its ideal window. It’s probably the most pleasurable eating experience either of us has ever had while standing up. While making this style of sushi at home pales in comparison to the craft on display at Daigo, it’s nonetheless a delicious and interactive snacks-for-dinner meal. You can prep an assortment of fillings in advance, and then let everyone at the dinner table assemble as they please. Take care when seasoning your rice, stirring it gently when you add the vinegar to prevent it from getting mushy. And get creative with the fillings—it’s a fun opportunity to dig out lingering condiments and leftovers from the back of your fridge. But, as with the rice, spend some time preparing them. This temaki is meant to be eaten straight out of hand, and the fillings should be prepped in a way that makes them easy to bite through without creating any mess. To that end, avoid the temptation to overfill them. Each roll is a three- or four-bite snack.
Updated at: Thu, 17 Aug 2023 05:11:55 GMT
Nutrition balance score
Uh-oh! We're unable to calculate nutrition for this recipe because some ingredients aren't recognized.
Ingredients
4 servings
Sushi Rice
1 ½ cupssushi rice
1 ½ cupswater
1 squarekombu
2 - by - 2 - inch
3 tablespoonsrice vinegar
½ teaspoonkosher salt
¼ teaspoonsugar
For Assembly and Serving
Filling Suggestions
Cucumbers
sliced into thin matchsticks
Avocado
sliced into thin wedges
Kimchi
coarsely chopped
Mango
sliced into thin matchsticks
Purple radish
or daikon, sliced into thin matchsticks
sprouts
crunchy, such as sunflower sprouts
Pickled Mushrooms
Carrots
sliced into matchsticks
Pickled Beets
sliced into matchsticks
Baked Japanese “Omelet” |
Instructions
Step 1
To make the rice: Place the rice in a bowl or saucepan and cover with an inch of water. Swish the grains gently a few times, then drain off the water. Repeat twice. The idea here is to rinse off excess starch from the grains. Then combine the drained rice with 1½ cups of water, either in the saucepan you plan to cook it in, or the bowl that fits into your rice cooker, and soak for at least 30 minutes.
Step 2
If using a rice cooker to cook your rice—add the kombu to the rice and water, and simply follow the manufacturer’s instructions for cooking white rice. Or, to cook on the stovetop, add the kombu to the rice and place over medium-high heat to bring the water to a boil. Once it comes to a boil and the water level has dipped down to the level of the rice, cover the pan, reduce the heat to its lowest setting, and cook for 18 minutes. Remove from the heat and let stand for 10 minutes more.
Step 3
Meanwhile, whisk together the rice vinegar, salt, and sugar in a small bowl, until the solids dissolve.
Step 4
Transfer the rice to a wide mixing bowl, a handai (which is the traditional wooden rice bowl), or a wooden salad bowl, which is what I use. Drizzle the seasoned vinegar over the rice as evenly as you can, then gently fold the rice to distribute the seasonings, resisting the urge to mash the rice by folding too aggressively. If using a rice cooker, return the rice into it and keep on the warm setting. If cooking on the stovetop, return the rice to the saucepan and cover with a lid to keep warm.
Step 5
Cut the nori sheets in half using scissors, creating two long rectangles from each.
Step 6
When you’re ready to serve, toast each nori sheet by briefly waving it over your stovetop burner set to medium-high, until it becomes fragrant and crispens slightly. This will only take a few seconds. Stack the sheets as you go, taking care to not let them get wet.
Step 7
With a toasted nori sheet flat on your work surface, spread about 2 tablespoons of rice into an even layer that covers about half of it in a square shape. Arrange desired fillings on top, then roll up like a cigar and eat immediately.
Baked Japanese “Omelet” |
Step 8
Makes one 8-by-8-inch omeletThe rolled Japanese omelet called tamagoyaki is made by cooking thin layers of beaten egg, dashi, and other flavorings in a square-shaped skillet and, as each layer cooks, rolling it up into a cigar, and then continuing to add more small amounts of egg, layer by layer, rolling each one over the next, until you’ve got a thick omelet in which all the individual layers are visible when you cut it crosswise. It’s a fun thing to make, and you can even do it in a round skillet. But for hand rolls, where the omelet is meant to be a filling rather than a standalone item, I’ve simplified the process by cooking the dashi-seasoned eggs in a single thin layer in a square pan in the oven. This also makes it easy to portion out and size into strips that are perfect for the hand rolls.
Step 9
First, make the dashi: Combine the kombu and water in a saucepan and bring to a bare simmer—don’t let it boil. Fish out the kombu, and set mixture aside to cool until warm.
Step 10
Preheat the oven to 350°F. Brush an 8-by-8-inch square baking pan liberally with oil, then line with two long overlapping strips of parchment paper, allowing overhang on the ends.
Step 11
Beat the eggs thoroughly, then whisk in ¼ cup of the kombu dashi (save the remaining for soup or sipping), as well as the sugar, mirin, and salt. Pour the mixture into the prepared pan and transfer to the oven. Bake until the eggs are just set, 14 to 18 minutes. Cool until warm, then use the parchment paper overhang to lift the egg from the pan. Slice into long, narrow strips the same length as your nori squares above
Notes
1 liked
0 disliked
Delicious
Easy
Go-to
One-dish
Special occasion
There are no notes yet. Be the first to share your experience!
