By mamagourmand.com
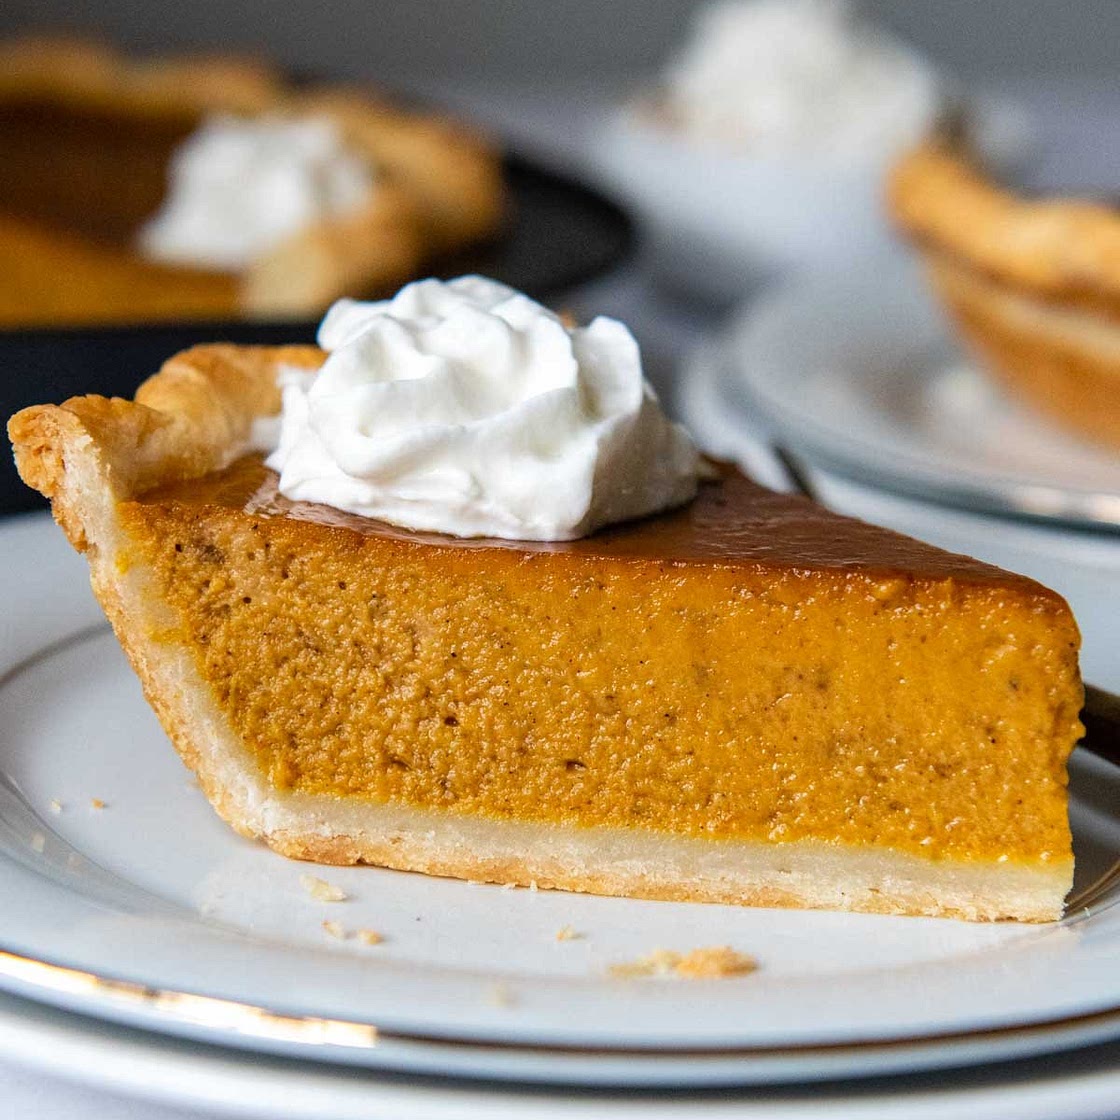
Perfected Gluten-Free Pumpkin Pie (Easy, Homemade)
16 steps
Prep:30minCook:2h
Please all holiday guests with this easy, from scratch gluten-free pumpkin pie recipe! Start with an extraordinarily tender, flaky gluten-free pastry crust, and fill with a rich, custardy pumpkin pie filling, thanks to the addition of heavy cream. Plus, this gluten-free pumpkin dessert also includes a simple trick to avoid a soggy bottom crust!
Updated at: Tue, 07 Jan 2025 10:14:41 GMT
Nutrition balance score
Unbalanced
Glycemic Index
70
High
Glycemic Load
31
High
Nutrition per serving
Calories416.2 kcal (21%)
Total Fat24.6 g (35%)
Carbs43.8 g (17%)
Sugars21.8 g (24%)
Protein5.3 g (11%)
Sodium333.5 mg (17%)
Fiber2.8 g (10%)
% Daily Values based on a 2,000 calorie diet
Ingredients
8 servings
8 tablespoonunsalted butter
cut into small cubes and frozen for 10 minutes
2 ½ tablespoonswater
ice
1 ½ tablespoonssour cream
1 ½ teaspoonapple cider vinegar
6.5 ouncesgluten free flour
3/4 PLUS 2/3 cup, I highly recommend using Cup4Cup gluten-free flour
1 ½ teaspoonsugar
½ teaspoonsalt
3eggs
large, room temperature
15 ouncespumpkin puree
canned, not canned pumpkin pie filing
¾ cuplight brown sugar
packed
1 ½ teaspoonvanilla extract
1 ½ teaspoonground cinnamon
½ teaspoonground ginger
¼ teaspoonground nutmeg
⅛ teaspoonground cloves
¼ teaspoonsalt
1 cupheavy cream
see recipe notes for dairy-free
1egg
Optional egg wash, beaten with 1 tbsp water, for shiny crust
whipped cream
for serving
Instructions
Gluten-Free Pie Crust
Step 1
Place the cubed butter in the freezer for 10 minutes. Mix together the cold water, sour cream, and vinegar in a small bowl. Place the liquids bowl in the refrigerator until you are ready to use.
Step 2
FOOD PROCESSOR: Pulse flour, sugar, and salt together until mixed.BY HAND: Whisk dry ingredients in medium-sized bowl.
Step 3
FOOD PROCESSOR: Process the butter into the flour mixture until well incorporated, evenly dispersed, and without large chunks.BY HAND: Use a pastry blender, fork, or fingers to cut and knead butter into the dough until it is well incorporated throughout.
Step 4
FOOD PROCESSOR: Add the liquids to the food processor and pulse until the flour becomes moistened and small dough clumps appear. If dough doesn't start to come together, add a touch more cold water. BY HAND: Add half the liquids and knead with fingers or a fork. Pour in the remaining liquids. Knead until the dough starts to come together and the liquids are well mixed with flour.TIP: To check if you have enough liquid, clump and flatten a small bit of dough. If it doesn’t stick together, is crumbly, or breaks apart easily, add a small dash of ice water. Pulse a few times and recheck. If the dough is too wet or sticky, add a dash of flour. Pulse a few times and recheck.
Step 5
Turn dough onto sheet of plastic wrap and flatten into a thick 1" disk. Wrap tightly and refrigerate for at least 1 hour or freeze for 30 minutes. Before rolling out, let sit on counter 5 minutes so it is easier to work with.
Step 6
Use a silicone pastry rolling bag or lay a large piece of parchment paper on your workspace. Place unwrapped dough disc in middle and place same sized sheet on top. Use a rolling pin to press and spread out down from the middle out. Roll out into a circle slightly larger than your pie dish.
Step 7
Remove top paper, and invert onto pie dish. Remove second paper. TIP: If the dough warmed while rolling, it may be trickier to take the paper off. If this happens, leave the paper on, and stick the whole thing in the fridge for 5-10 minutes. Once the crust is chilled again it's much easier to pull off the paper. If the dough is too cold and the crust breaks, let it sit on the counter for a minute first.
Step 8
If necessary, trim the edges so there is an even ½ inch overhang all around the edges. Tuck the edge under, all the way around, and then use your finger and thumb to make a decorative edge. Freeze the crust for at least 15 minutes before filling.
Pumpkin Pie Filling
Step 9
While it is freezing, preheat the oven to 400ºF. Place a baking sheet on the middle rack. The baking sheet heats, along with the oven, to place the pie on. The metal conducts the heat better, which makes a crisp bottom crust.
Step 10
For the filling, first make sure the eggs are at room temperature. If you need to do this quickly place the whole eggs in a bowl and cover with hot water. Let sit for 5 minutes. Then crack the eggs in a small bowl and lightly whisk with a fork. This avoids over-mixing the filling, which can cause the pie to crack upon cooling.
Step 11
In a large mixing bowl stir together the canned pumpkin puree, brown sugar, vanilla extract, spices, and salt. Once that has been mixed well, add the lightly beaten eggs and heavy cream. Gently stir to just combine, without any streaks left.
Step 12
Remove the crust from the freezer. For a shiny crust edge (optional), brush with the egg wash on the outer crust edges and about 1 inch down from the top. (It's okay if some of the egg drips down into the crust.)
Step 13
Pour the mixture into the crust. Transfer the pie to the hot baking sheet in the oven. Bake for 15 minutes. Leave the pie in the oven, but lower the temperature to 350ºF. Protect the crust with a pie shield or loosely over the edges with foil.
Step 14
Continue to bake for 50 minutes longer, or until edges are set, firm and start to puff and slightly crack. When the pie is gently moved, the middle shouldn't be sloshy, liquidy. If you don't mind puncturing the pie, you can stick a knife or toothpick in the center. It should come out without liquid.
Step 15
Cool the pie completely before slicing and serving, about 3-5 hours. For best results, make the pie one day ahead of serving and store at room temperature, uncovered or loosely tented with foil.
Step 16
DID YOU MAKE THIS RECIPE?? DON'T FORGET TO LEAVE FEEDBACK AND/OR CLICK A STAR RATING ON THE RECIPE CARD
View on mamagourmand.com
↑Support creators by visiting their site 😊
Notes
0 liked
0 disliked
There are no notes yet. Be the first to share your experience!
