By Vinokurov Marina
Classic Challah Recipe (W/ Mixer)
16 steps
Prep:2hCook:25min
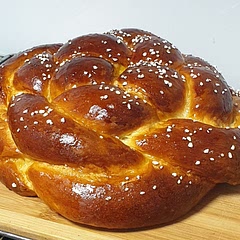
Its by far best challah I ever made. Bengingi's recipe just perfect, but I add some steps from myself, if you would like to made sweeter holiday variations..
Updated at: Thu, 17 Aug 2023 05:06:54 GMT
Nutrition balance score
Unbalanced
Glycemic Index
74
High
Glycemic Load
54
High
Nutrition per serving
Calories436.9 kcal (22%)
Total Fat11.6 g (17%)
Carbs73.5 g (28%)
Sugars8.3 g (9%)
Protein10.7 g (21%)
Sodium554.9 mg (28%)
Fiber0.4 g (2%)
% Daily Values based on a 2,000 calorie diet
Ingredients
6 servings
Instructions
Step 1
- In a small bowl mix water, yeast, and sugar. Stir well and let it sit on the counter for 10 min. In that step, we activate our yeast. If not blooming after 10 min it means that your yeast probably died.
Step 2
- In your mixer bowl add the ingredients from the previous step and add the egg. Stir well.
Step 3
- Add the flour to the mixer bowl and don't stir.
- Pour the olive oil on top.
Step 4
- Set the mixer on lowest speed and start mixing for 4 min until we get an homogenous dough.
Step 5
- Change the mixer to a higher speed, only one level faster than the slowest one. We don't want to stress our dough. Work the dough in that speed for 5 min.
Step 6
- Add the salt.
- Keep kneading for 3 min. Total kneading of the dough should be 12 min.
Step 7
- Round the dough and place in an oiled bowl to proof. Cover with a towel to avoid the dough from drying out.
Step 8
The dough should double in size - time completely depends on room temperature. It can take an hour or even less.
Note from me (Marina :) ) If you have time and for extra fluffiness, you can push the dough down and let it rise again.
Step 9
- After doubled in size, divide the dough to the desired amount of strands you want.
- Round each piece to a perfect sealed ball. Place them 2 inches apart and cover with a towel. Let them rest for 10-15 min.
Step 10
Start dough shaping
Step 11
- Flattening each ball to a pita shape, start to roll the top towards you creating a sausage shape. In this way, we avoid air pockets in the strands. We want our challah to be with no holes inside. - Open the strands in a way that the edges are slightly thinner than the center of the strand. It will result in beautiful and easy-going braiding. - When the strands are ready to be braided, flour them gently. This way they will stay separate from each other when being baked. - Attach the top of all the strands together and start to braid.
Step 12
- Cover the braided challah with a towel and let it proof. You know it is ready to be baked when you touched the strands (gently!!!!!) and it bounced back slowly. - Brush with egg yolk mixed with a sip of water. Don't make a pool of eggs on the challah. Light Brushing. We don't want an omelet on our bread!
- Spread the desired toppings.
Step 13
Bake in a preheated oven to 380F or 190C for about 25 min. If the top of the challah gets brown too fast, cover the top with aluminum foil. - Cool the challah on a rack.
Step 14
Note from me (Marina :) ) - as a Holiday sweet variation, you can make sweeter challah. Use 3/4 cup of sugar and a full cup of water.
Step 15
Note from me - If you would like, you can also brush it with Sugar - Honey Syrup:
0.5 cup sugar + 0.5 cup water + 1 tablespoon honey + 0.5 tablespoon lemon - Prepare syrup while the dough is puffed
Put all the ingredients in a small pot, bring to a boil, lower and cook for about 10 minutes at a gentle boil. Set aside to cool. - Brush hot challah right from the oven. Sirup will create the glaze, but it still will be a bit sticky
Step 16
Note from me (Marina) If you would like to freeze challah, let it cool, wrap in foil, and put in the freezer. When you want to eat, heat with foil, a few minutes in a hot oven
View on bengingi.com
↑Support creators by visiting their site 😊
Notes
1 liked
0 disliked

